
DIY Bar Ledge: How to Make an Industrial Bar Ledge
So it's August 1st..... &#%@ !!! (This four letter word is up to your interpretation.)
Where the hell did July go? I feel like it flew by and that's probably because we've been knee deep in a basement renovation for what feels like forever.
And as my friend Andy always says:
"To a teacher July is like a Saturday and August is like one long Sunday." Ugh...
I did notice this year that most of my friends haven't asked where has the summer went or made comments about how it's flying by... and then I realized like 10 of you had babies in the last month and aren't going back to work in one month... ha.
Anyways, we're almost done with this basement remodel... as my plan is to pump out three sliding barn doors today and as soon as Shad hangs them, we're pretty much done.
I'll be posting the details about our remodel in future posts. For now check out this cute "industrial" (I'm calling it industrial because it has pipes...) bar ledge.

This is the area of our basement where Shad and his friends congregate to play darts and the family favorite "ring game" (has anyone ever heard of that before? I never did until I met the "King of Games"... Shad), so it was the perfect spot for some extra seating for when we have friends over.
Here is the before... I'm terrible at taking before pictures... so this was right before we ripped up the carpet, and I decided to spend $70 in paint samples to get just the right color. (I can somehow pick colors easily for others but this basement threw me through a loop).

This ledge was super easy to make- as in I put it together and put it up myself with no help... and if I can do it, any one can do it.
So the formula for this EASY ledge is:
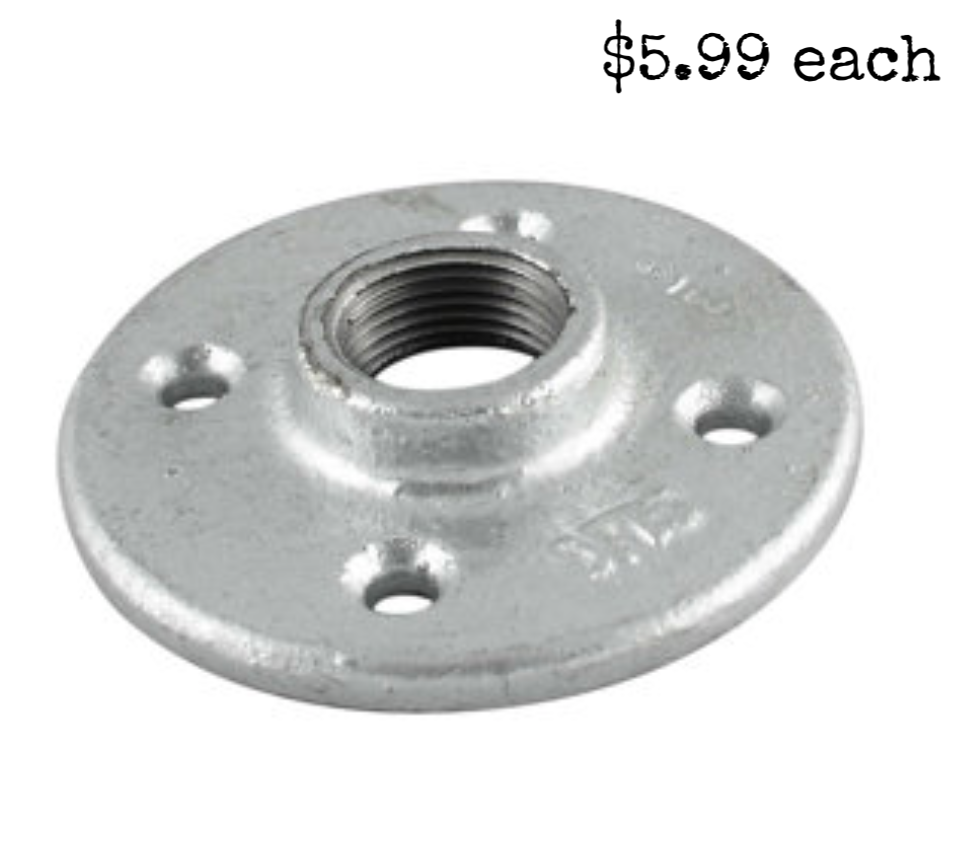
(4) 1 inch floor flanges+ (2) 1 inch 90 degree elbows+ (2) 1x4 inch nipples + (2) 1x6 inch nipples + 1x8 board in the length of your choice + a can of flat black spray paint + stain of your choice
Here is a closer look at the pipe ledges prior to me spray painting them black:

Real galvanized pipe pieces can get expensive, so the cheapest place I found these pipe parts is at Tractor Supply (note: if you're from Orange County, for whatever reason the Middletown Tractor Supply does not carry the floor flange piece in store... but the Chester one does. Instead of driving down to Chester... I broke the bank and paid $2 more a piece to get them at Lowe's. )
Here are direct links (click on the pictures):


Note: You can go with two 6 inch nipples instead of a 4 inch and 6 inch if you wanted to, then you would have to adjust the width of your board to greater than 8 inches (which actually measures to somewhere around 7.5 inches in reality). I only did a 4 inch pipe coming out from the wall because we have a basement door that leads out to bilco doors, and I didn't want the ledge blocking that door from almost completely opening.
Tools:
Miter Saw for your wood cut (if you don't have one, determine the length you want your board prior to going to Home Depot, and ask them to cut it for you).
Stud finder.
Foam Brush or Rag for staining.
Screws (at least 1 inch to secure to wall, and 3/4 inch to drill pipe into ledge without it poking through).
Drill to screw in pipe pieces and ledge.
Steps:
Step 1: put the pipe parts together
Step 2: Get some flat black spray paint and spray paint the pipe pieces while together.
Step 3: Cut your wood piece to the length you want it. In my case, I determined the length by figuring out where the studs were located in this wall in order to screw the pipe pieces into those studs. Galvanized piping is very heavy and you want to make sure that it's secured to a stud.
Step 4: Stain your wood. (Also apply a coat of polyurethane for protection if you plan on having people rest drinks on it)
Step 5: Using your stud finder, locate the studs on the wall, and screw at least 2 of the 4 holes of the flange for screws into the stud.
Step 6: Put your board on top of the piping and screw in using your 3/4 length screws from underneath.
Optional 7th step: If you're worried about the stability of the ledge, get 2 L brackets like pictured below and put them underneath the ledge as well. Although this ledge was super sturdy just being attached to the piping, I put two of these underneath, just to be sure. (You can't see them because I painted them the same color as the wall).

And Voila! You have an awesome ledge that adds extra seating to your room.
Total cost for me was under $60, but that's because I had screws, a huge can of stain I purchased a while back that I use on everything, and a can of spray paint from another project.


Check back in the next few weeks as I try to make up for the fact that I haven't posted in over a month. I"ll be posting the following:
-A Pallet Wall How To
- Details on our basement reno including links to items, paint colors, flooring, etc.
- Our Stairway Transformation
- The planning details on our vacations to Arizona and Utah
If you enjoyed this post or have any questions, feel free to comment below or share with a friend. Thanks for stopping by!
:) Barbra
Hey Friends, I spend a lot of time putting together these posts, and I would love it if you’d show some love back and followed me on Instagram. **** 10/2020: Recently my instagram was erased and I lost all of my following, so I would SO appreciate it if you followed me by clicking on any of the pictures below from my current feed. Thank you so much!! <3